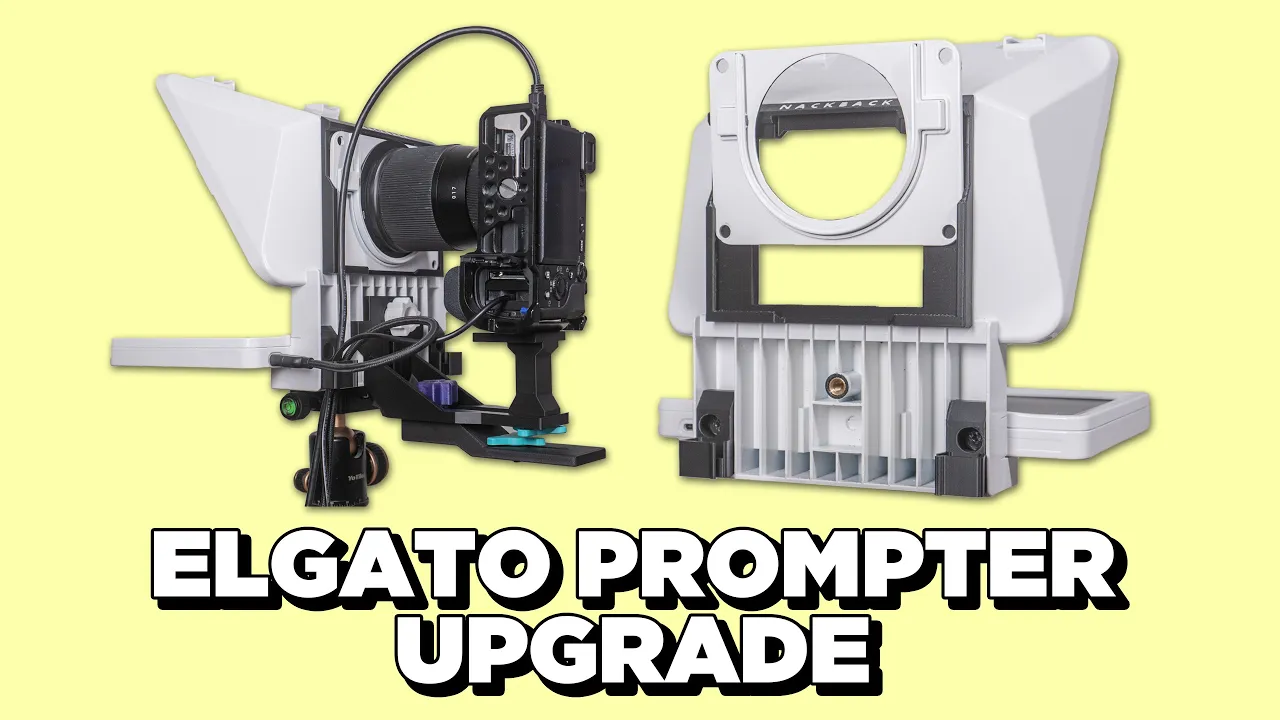
Setup Guide for Nackback v2
Below is a step-by-step guide for installing the Nackback V2 on your Elgato Prompter. Linked below is the video guide if you'd prefer to watch and follow along, or you can scroll down and view the guide with pictures.
Remove the large L-Bracket that came with your Elgato Prompter.


Remove the x2 Elgato knurled thumbscrews holding the Elgato lens mount plate, and remove the plate temporarily.

Take this off but keep it close!

Take the Part D - Lens Plate Adapter and secure it to the Elgato Prompter using the included Black 1/4"-20 screws, one in each top corner. Just like the Elgato plate, there is a small tab on the inside that should get inserted first.


Take the lens ring mounting plate that was included with your Elgato Prompter and slide it into the Nackback Part D - Lens Plate Adapter. Unlike how this was designed, make sure to turn this upside down before sliding it into place so the camera can be dropped in from the top.


Take the Landscape Spacer [Part A] and insert one of the Large Thumboneys [Part E1] into the shorter side of the L bracket.

Each of the larger thumbscrews have a small divot on the backside, which lets you hold the thumbscrew in place while tightening or loossening with other fingers.


After you have screwed in the thumbscrew about halfway, rotate the L bracket so the longer face is facing upwards, then tighten the thumbscrew the rest of the way.

To prepare this bracket for portrait recording, drop in the second Part E2 - Low Profile Thumboney Screw into the top of the Part A - Main L Bracket.


Now take either the C1 - Landscape Spacer, Large or C2 - Landscape Spacer, Small and screw it in using E2 - Low Profile Thumboney Screw.

Did you know you can purchase additional thumbscrews for your kit?
You can now secure the Part B - Landscape Spacer to the Part A - Main Bracket using another one of the included E1 - Thumboney Tire screws. In the images below, the landscape spacer is shown screwed to the bottom of the camera, but you can install it without the camera at this time.


Here is how it looks when the camera is installed. Speaking of, lets install the camera in the next step.

If you haven't already, install the lens ring for your camera lens. These came with your Elgato prompter, and there is a different ring for each size lens you might be using. These lens rings screw onto the end of your camera lens.


Make sure you installed your Elgato Lens Ring Plate correctly, which is upside down. The grooves of the lens plate should should like a "U" shape.

When the Elgato Lens Plate is installed upside down, you can drop in your camera from the top and rest it on the Part B - Landscape Spacer that is screwed into the Part A - Main Bracket.

Warning: Do not let your camera dangle like this
While I have been testing this kit for the last 14 months, I’ve left the camera hanging like the picture above for hours, even days at a time, and it hasn’t failed. However, that doesn’t mean it wont ever fail. And your camera might be much heavier than mine. When switching from landscape to portrait, support the weight of the camera with one hand while you’re rotating, or remove the camera completely to prevent the chance of the camera falling off the mount.

Source: Elgato Prompter Setup Guide
Grab any cables that will be connecting to your camera, and run them through the cable management clips on the left or right side of your prompter.


Here is an example of how the parts are mounted. The Part B - Landscape spacer does not need need to be positioned exactly like this. Slide the spacer forward or back to find the best placement for your camera.

Now that you have all your parts installed, you can choose to set it in landscape or portrait mode.
When you're ready to switch to portrait mode, just rotate the whole bracket assembly 180 degrees so it's upside down. Rotate your camera 90 degrees, and the camera will rest it portrait mode.


If you need to remove your camera to use for recording content elsewhere, keep your prompter dust-free with the Part F - Hole Cover.

You did it! Good work.